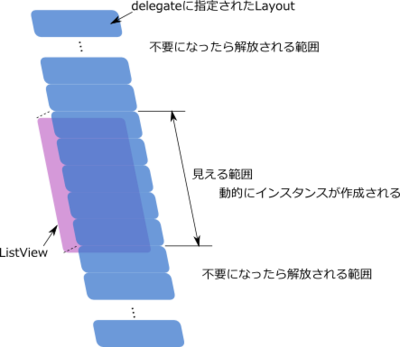
/// ListViewの動作ポイント ///
・Model情報を解析して表示可能範囲のアイテムが1つずつ動的にインスタンス化される
・delegateに設定されたレイアウトが使い回される
・動的にインスタンス化されるのでいつもとidの値などの扱いが違う
サンプルで上位に自分のインスタンスを「_layout1」をクリックイベント内で「clickList」へ渡してます。
見た目は共通になるイメージですが、実体はそれぞれのアイテムで別になります。
そもそも「Listview.delegate: ListLayout{ ... }」としているので他の言語ならクラスをnewするイメージです。
逆にエレメントのプロパティに他のエレメントのidを指定する時はポインタを渡してる感じですね。
リストのアイテムは画面外にでると設定状態にあわせて破棄されます。
こんな感じ
このListViewとModelとDelegateの関係がちゃんと理解できると「Repeater」を使用して、Column/Row/Gridの利用幅が広がります。
以前の記事の「QML(Qt)でコンテキストメニューを表示する」のコンテキストメニューの部分で利用しています。
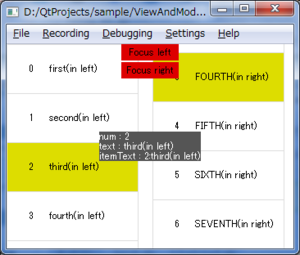
/// サンプル動作 ///
・リストのアイテムをクリックすると画面中心に情報を表示します。
・赤いボタンを押すとリストへフォーカスが移動してカーソルキーでハイライトが移動します。
・赤いボタンを押すと現在のハイライトアイテムの情報を表示します。
/// サンプルのポイント ///
・クリックしたアイテムの情報を取得する
・ハイライトの共通化
・クリックしたアイテムをハイライトする
/// クリックしたアイテムの情報を取得する ///
「ItemLayout.qml」内でMouseAreaを設定してクリックイベントをシグナルで上位に伝えれるようにしています。
その時、引数を定義すれば自分の保持している文字列などを渡せます。
delegateに指定したItemLayout{ /* ここ */} の中にStep1のイベントを受けて更に上位が持っているメソッドを呼び出せます。
この時、上にも書いてますがItemLayoutに指定したidをメソッドに渡すとクリックしたアイテムを操作できます。
/// ハイライトの共通化 ///
リストの現在のアイテムをハイライトする事ができます。
ListViewのヘルプや「Models and Views: ListView Example」を見ると簡単にできます。
ただ、この方法だとListViewが複数配置されているとハイライト用の情報を複数記述しないといけなくなってしまい冗長です。
なので共通化する方法です。
で、何が問題かと言うと。
下にListViewのヘルプにあるサンプルを用意しました。
ハイライトされているアイテムを目立たせるための四角の位置やサイズをListViewの情報を使ってるので共通化がしにくいのです。
公式サンプル転記
 Component {
     id: highlight
     Rectangle {
         width: 180; height: 40
         color: "lightsteelblue"; radius: 5
         y: list.currentItem.y
         Behavior on y {
             SpringAnimation {
                 spring: 3
                 damping: 0.2
             }
         }
     }
 }

 ListView {
     id: list
     width: 180; height: 200
     model: ContactModel {}
     delegate: Text { text: name }

     highlight: highlight
     highlightFollowsCurrentItem: false
     focus: true
 }
で、ハイライト用のコンポーネントはエレメントとして別ファイルに分けます「ItemHightlight.qml」がそうです。
ListView側は「highlight: ItemHightlight{ ... }」としてエレメントをidではなくインスタンスを生成して指定します。
こおすれば各ListViewに独立した情報を指定できるのです。
/// クリックしたアイテムをハイライトする ///
「ListView.currentIndex」を指定すればOKで簡単です。
でもクリックしたアイテムがリストの中で何番目かどのようにして知るか?です。
それも実はすごい簡単で「ListView.indexAt(x, y)」メソッドを使えば簡単にできます。
/// サンプルのスクリーンショット ///
// main.qml

import QtQuick 1.0

Rectangle {
    id: _root
    width: 350
    height: 250

    // リストの情報を表示
    function clickList(list, object, itemText){
        // クリックアイテムをハイライトする
        list.currentIndex = list.indexAt(object.x, object.y);
        // デバッグ表示
        _debugText.text = "num : " + object.number
                      + "\ntext : " + object.text
                      + "\nitemText : " + itemText;
    }

    // リストの配置
    Row{
        spacing: 3

        ListView{
            id: _listLeft
            width: _root.width / 2
            height: _root.height
            // ハイライト設定
            highlight: ItemHightlight{
                _listObject: _listLeft
            }
            // モデル
            model: Items1{}
            // デリゲート
            delegate: ItemLayout{
                // インスタンスごとに生成される範囲
                id: _layout1
                // 表示レイアウトへ具体的な値をセットする
                number: _number
                text: arrangeText(_text)
                // 表示するデータをアレンジもOK
                function arrangeText(text){
                    return text + "(in left)";
                }
                // クリックイベント
                onClicked: {
                    // こんな風に更に上位へデータや自分のインスタンスを渡すのもできる
                    clickList(_listLeft, _layout1, itemText);
                }
            }
        }

        ListView{
            id: _listRight
            width: _root.width / 2
            height: _root.height
            // ハイライト設定
            highlight: ItemHightlight{
                _listObject: _listRight
            }
            // モデル
            model: Items2{}
            // デリゲート
            delegate: ItemLayout{
                // インスタンスごとに生成される範囲
                id: _layout2
                // 表示レイアウトへ具体的な値をセットする
                number: _number
                text: arrangeText(_text)
                // 表示するデータをアレンジもOK
                function arrangeText(text){
                    return text + "(in right)";
                }
                // クリックイベント
                onClicked: {
                    // こんな風に更に上位へデータや自分のインスタンスを渡すのもできる
                    clickList(_listRight, _layout2, itemText);
                }
            }
        }
    }
    // 左のリストへフォーカスセットして現在の情報表示
    Rectangle{
        anchors.horizontalCenter: parent.horizontalCenter
        y: 0
        width: 70
        height: 20
        color: "#dd0000"
        Text{
            anchors.centerIn: parent
            text: "Focus left"
        }
        MouseArea{
            anchors.fill: parent
            onClicked: {
                _listLeft.forceActiveFocus();
                clickList(_listLeft, _listLeft.currentItem
                          , "current selected");
            }
        }
    }
    // 右のリストへフォーカスセットして現在の情報表示
    Rectangle{
        anchors.horizontalCenter: parent.horizontalCenter
        y: 22
        width: 70
        height: 20
        color: "#dd0000"
        Text{
            anchors.centerIn: parent
            text: "Focus right"
        }
        MouseArea{
            anchors.fill: parent
            onClicked: {
                _listRight.forceActiveFocus();
                clickList(_listRight, _listRight.currentItem
                          , "current selected");
            }
        }
    }

    // 情報表示
    Rectangle{
        x: _debugText.x
        y: _debugText.y
        width: _debugText.width
        height: _debugText.height
        color: "#555555"
    }
    Text{
        id: _debugText
        anchors.centerIn: parent
        text: ""
        color: "#ffffff"
    }
}
リストの表示アイテムのレイアウト
// ItemLayout.qml

import QtQuick 1.0

Rectangle {
    id: _root
    width: 160
    height: 60
    // 枠線
    border.color: "#dddddd"
    border.width: 1

    // 実際に表示する部分へのエイリアス
    property alias number: _layoutNumber.text
    property alias text: _layoutText.text

    // 上位への通知用のシグナル
    signal clicked(string itemText)

    // 表示アイテムを配置
    Row{
        anchors.centerIn: parent
        spacing: 5
        Text{
            id: _layoutNumber
            width: 20
            text: ""
        }
        Text{
            id: _layoutText
            width: 80
            text: ""
        }
    }

    // クリック判定
    MouseArea{
        anchors.fill: parent
        onClicked: {
            // クリックシグナルを上位へ
            _root.clicked(_layoutNumber.text + ":" + _layoutText.text);
        }
    }
}
ハイライト用の情報
// ItemHightlight.qml

import QtQuick 1.0

Rectangle {
    id: _root

    property variant _listObject: null

    width: (_listObject.currentItem === null) ? 0 : _listObject.currentItem.width
    height: (_listObject.currentItem === null) ? 0 : _listObject.currentItem.height
    y: (_listObject.currentItem === null) ? 0 : _listObject.currentItem.y;
    color: "#dddd00"
    Behavior on y { SpringAnimation { spring: 2; damping: 0.1 } }
}
リストへ表示する内容(左用)
// Items1.qml

import QtQuick 1.0

ListModel{
    id: _items
    ListElement{
        _number: 0
        _text: "first"
    }
    ListElement{
        _number: 1
        _text: "second"
    }
    ListElement{
        _number: 2
        _text: "third"
    }
    ListElement{
        _number: 3
        _text: "fourth"
    }
    ListElement{
        _number: 4
        _text: "fifth"
    }
    ListElement{
        _number: 5
        _text: "sixth"
    }
    ListElement{
        _number: 6
        _text: "seventh"
    }
}
リストへ表示する内容(右用)
// Items2.qml

import QtQuick 1.0

ListModel{
    id: _items
    ListElement{
        _number: 0
        _text: "FIRST"
    }
    ListElement{
        _number: 1
        _text: "SECOND"
    }
    ListElement{
        _number: 2
        _text: "THIRD"
    }
    ListElement{
        _number: 3
        _text: "FOURTH"
    }
    ListElement{
        _number: 4
        _text: "FIFTH"
    }
    ListElement{
        _number: 5
        _text: "SIXTH"
    }
    ListElement{
        _number: 6
        _text: "SEVENTH"
    }
}
コメント